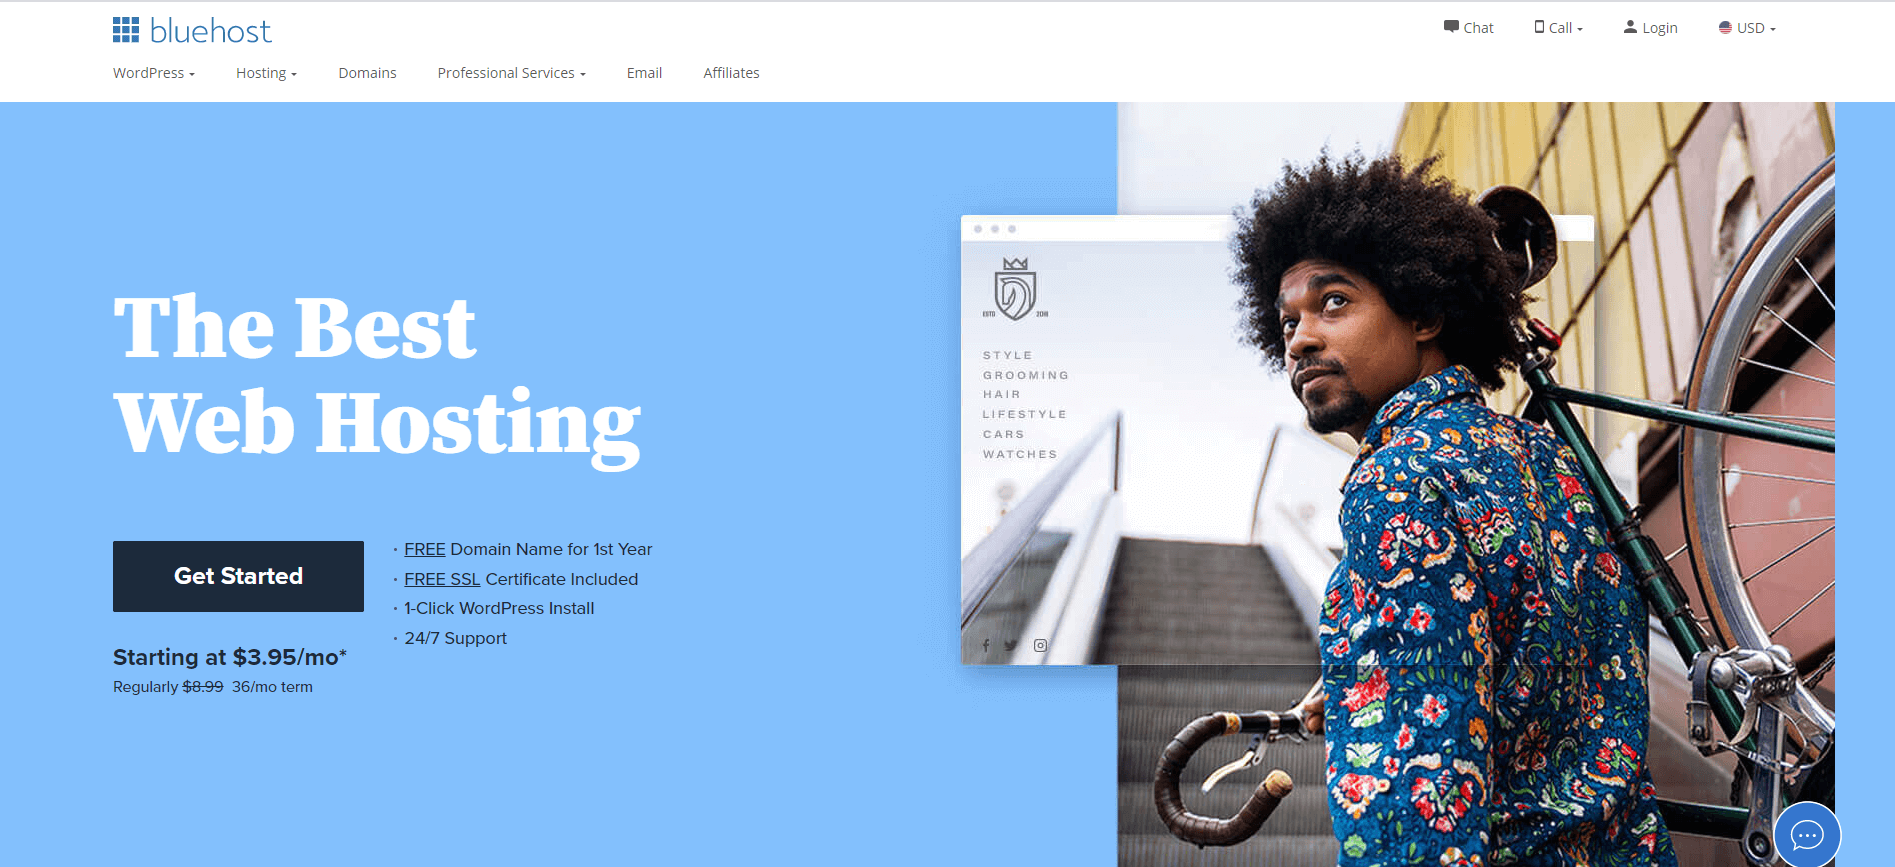
How to set up a highly professional and successful travel blog in under 30 mins.
A guide written by Aghosh Babu who has built over 200 blogs over 15 years.
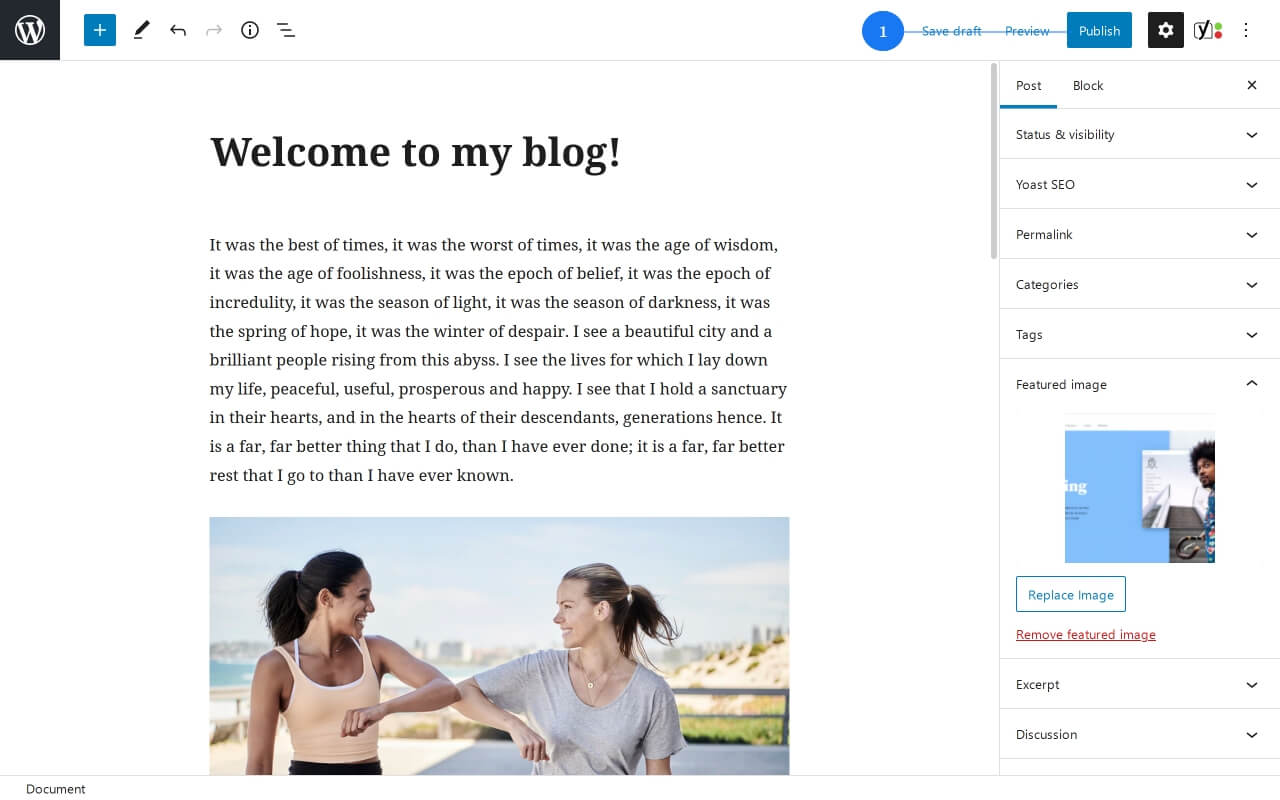
The hospitality industry, that is your travel, hotels, restaurant, etc. took a major hit since the pandemic. Things are opening up slowly but surely and they are all looking for influencers who can bring visibility to their business. YOU could be that influencer! and having your own professional travel blog is how you do it!
🚨🚨🚨 Read the rest of this later, go here and buy a hosting RIGHT NOW for a massive Black Friday discount!
- Why start a travel blog?
- Step 1: Finding and securing your free domain name
- Step 2: Setting up your hosting server for a massive discount
- Step 3: Installing WordPress
- Step 4: Designing your blog
- Step 5: Your First Post
- Step 6: Building an Audience
- Step 7: Monetizing your site
- Frequently Asked Questions
- About The Author
Hire me to build your blog!
As stated down below, if you get stuck following this guide, I will of course help you for free. That being said, you may not be technically inclined to build your own blog and rather have a professional like me build it for you. I can do this for you for $100.
This is how it works, you can click here to make the payment and I will get in touch via the email you provide during payment. This is my service charge and does not include the cost of hosting, or other expenses. Click here to buy hosting.
You will notice that this is a simple straight forward transaction, this is not a landing page full of testimonials and money-back guarantee, you are just hiring a professional and that is it. But should you need reviews, you can find my old freelancer reviews here.
Before we begin
- If you are stuck at any stage during the blog creation process, click here to get my help for free.
💰 Important!
This costs around $35 to $60 depending on the packages you select.
Can’t you start a travel blog for free? Yes, you can! but you won’t be able to make money off of it. Free platforms like WordPress.com or Blogspot do not allow external ads on their platform, and are not often indexed by Google to rank in search.
This is one of those you gotta spend a little money to make a lot of money kind of situations, there is no other way around this!
Email This Guide To Me
If you are busy right now but want to do this later on? No problem, enter your email here and I will email a link to this guide to you.
Why start a travel blog?
Now you might think that that you should be building your following in a platform like Instagram or YouTube, why start a travel blog at all?! It is simple, when you use a platform that you can not fully control, it is only a matter of time before you lose out to a policy change in that platform. We have seen countless examples of this in recent times.
What is the right way to be a travel influencer?
It is to have a website/blog – this allows you to run your own advertisements, affiliate marketing, and post content that you want to post and that is not dictated by the platform algorithms – you can always use external platforms like Instagram or YouTube to bring traffic to your site. Don’t take my word for it, do your own research – This is how all successful travel influencers are doing it!
Make money doing what you love!
Do you need more reasons, well, here is a big one – MONEY! There are numerous ways to monetise your blog. You can connect with travel companies, hotels, restaurants, even travel insurance people with whom you can collaborate and work out barter systems – like free stay in a five star hotel or a free meal for a review.

Making connections through words
Listen, I am not going to pretend that having a travel blog is going suddenly make you more attractive – but on the other hand experience working with travel bloggers tell me that it not only brings in money, it also satiates your need as an individual to be heard and understood. It gives you a platform to share your unique thoughts about the places you visit. The way you mold your stories will help you reach out to like minded people, make friends or even form a travel buddy gang. How wonderful it is to open up and meet new people with the same interests as you!
Build material for creative endeavors
A travel blog, if done right, will open up immense avenues for further publications like columns in magazines, T.V shows, and great online traction. If you wish to start a YouTube channel, starting with a blog is one of the best ways to go about. It builds authenticity and leaves some of your work for scrutiny if anyone wishes to look into your work so far. It is an excellent means to build an archive of materials that you can use as a foundation to build your career as a traveller/travel writer/speaker.
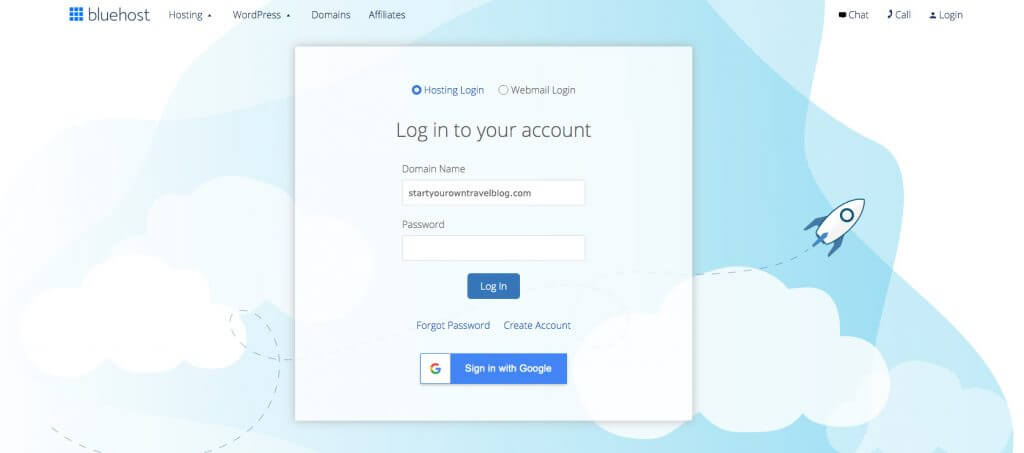
Step 1: Finding and securing a FREE domain name for your blog.
The term domain-name might be new to you, but the concept is not. A domain name is essentially the name of the website. When you type in Google.com – that is a domain name. This site’s domain name is “startyourowntravelblog.com”.
Your site also needs a unique name, this is going to be your online identity and when you become successful this will become your brand.
Keep it simple, easy to remember and professional. It can be as simple as “yourname.com” or “afavouritemotto.com” or “asonglyricsyoulove.com”. Avoid numbers and hyphenations in your domain name, as they are difficult to communicate.
A domain name typically costs over 10$ per year, but we are going to get it for FREE in the next step.
Step 2: How to setup your hosting server for a massive discount
If the term hosting server sounds technical and confusing, don’t worry, it is not. Hosting is simply where your website lives on the internet.
There are a LOT of companies that sell hosting, of which I recommend Bluehost. As a web developer, I have worked with ALL the popular brands over the last 15+ years. I would recommend Bluehost to someone starting out with travel blogging.
🏋️♂️ Important
The link above is an affiliate link. This means, if you use the link to purchase the hosting and free domain, I will get a commission at no additional cost to you. You will also get a 70% discount from the normal rates!
Bluehost has the cheapest rates, comes with a free domain name, gives a 30-day money-back guarantee, and provides live support over chat and phone. If there was a better option, I would be recommending that.
Click here to go to Bluehost, and follow the instructions below. This will take you all the way from buying your hosting server to set up your WordPress travel blog.
a. Click on Get Started
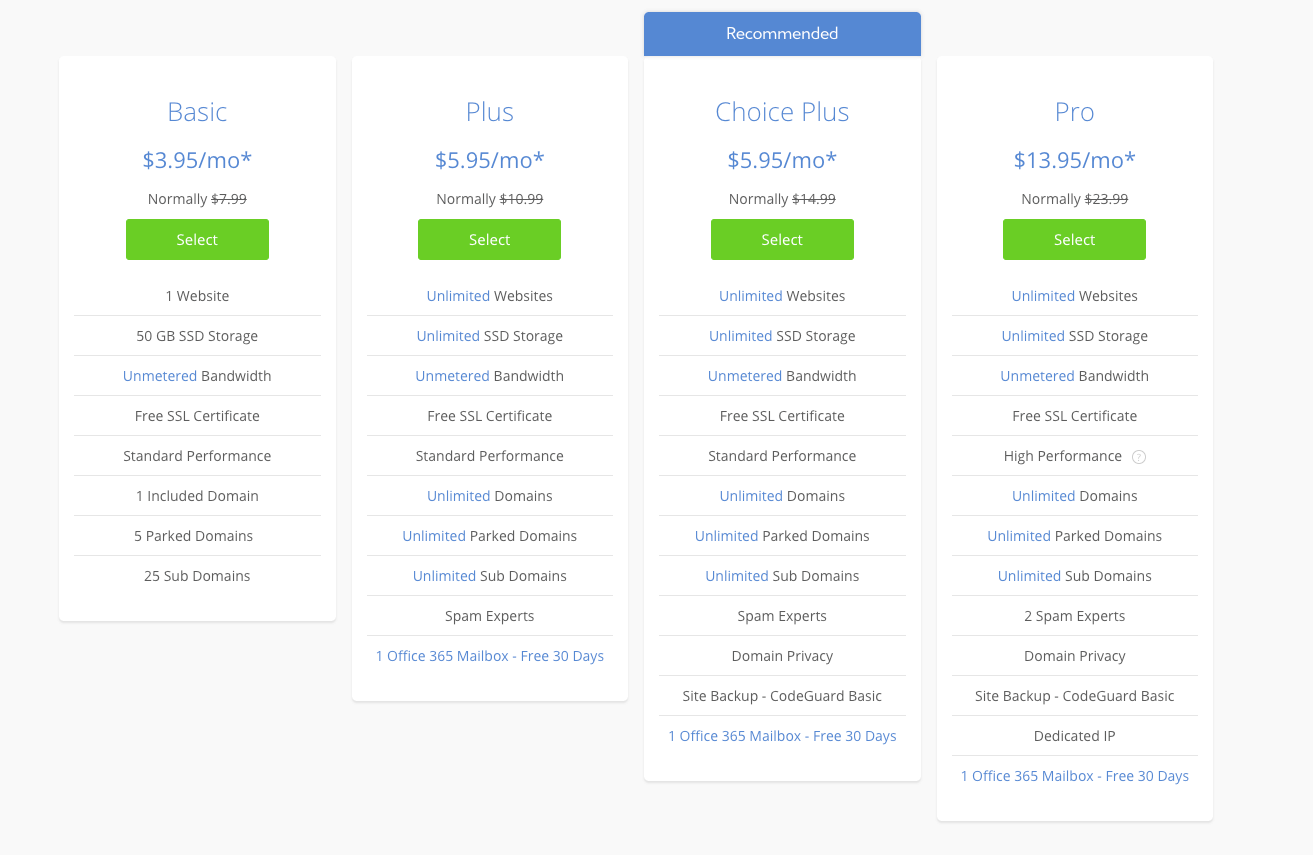
b. Select Your Plan
You won’t need anything more than Basic to get started, however, if the need arises in the future, you can upgrade at any time.
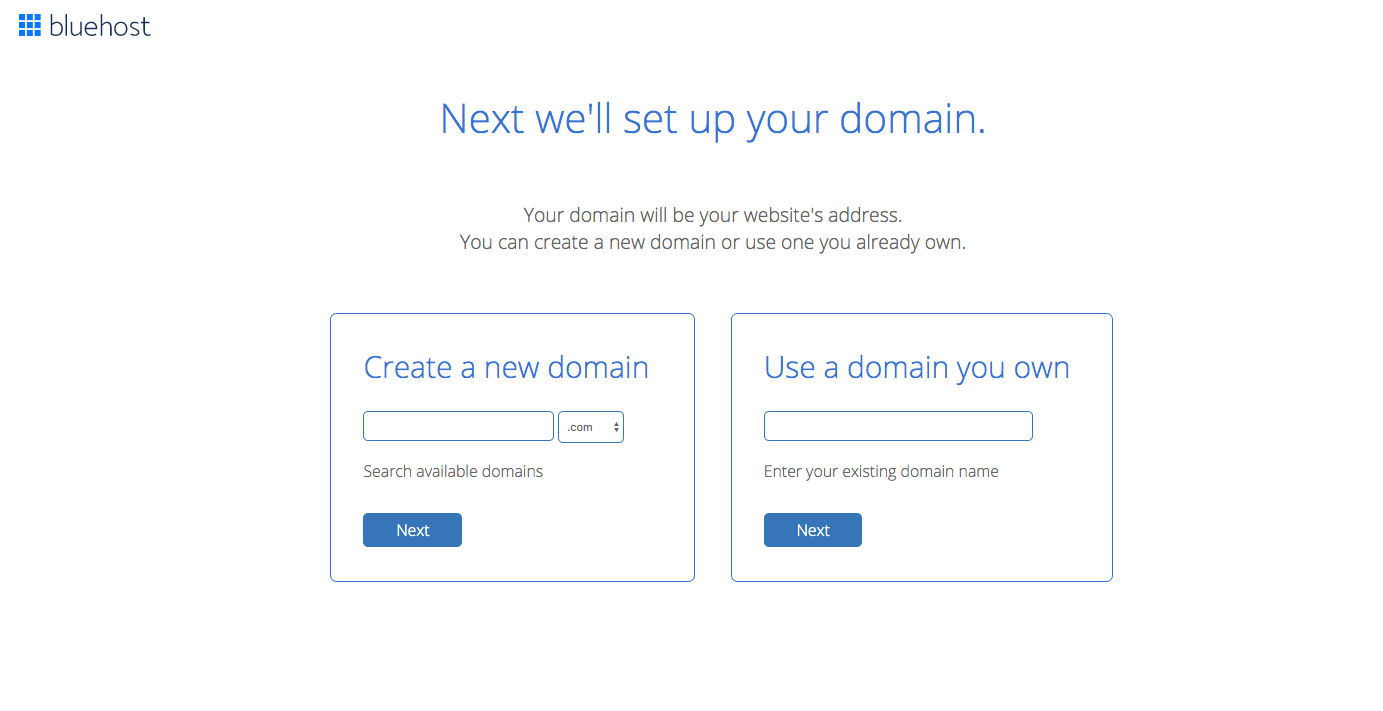
c. Get your free domain name
Fill in the domain name from Step 1, make sure you spelled it right. You wouldn’t believe the number of times I’ve had to help clients who made a spelling mistake in their domain names. If your domain name is not available, don’t worry just pick another name.
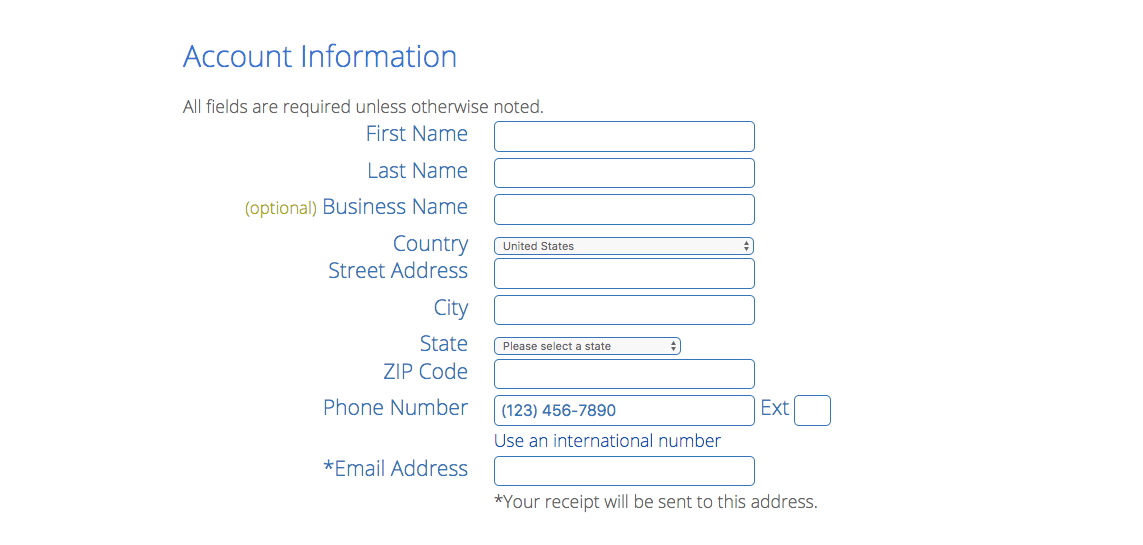
d. Fill up your account details
This is fairly straight forward, just fill up the form and go.
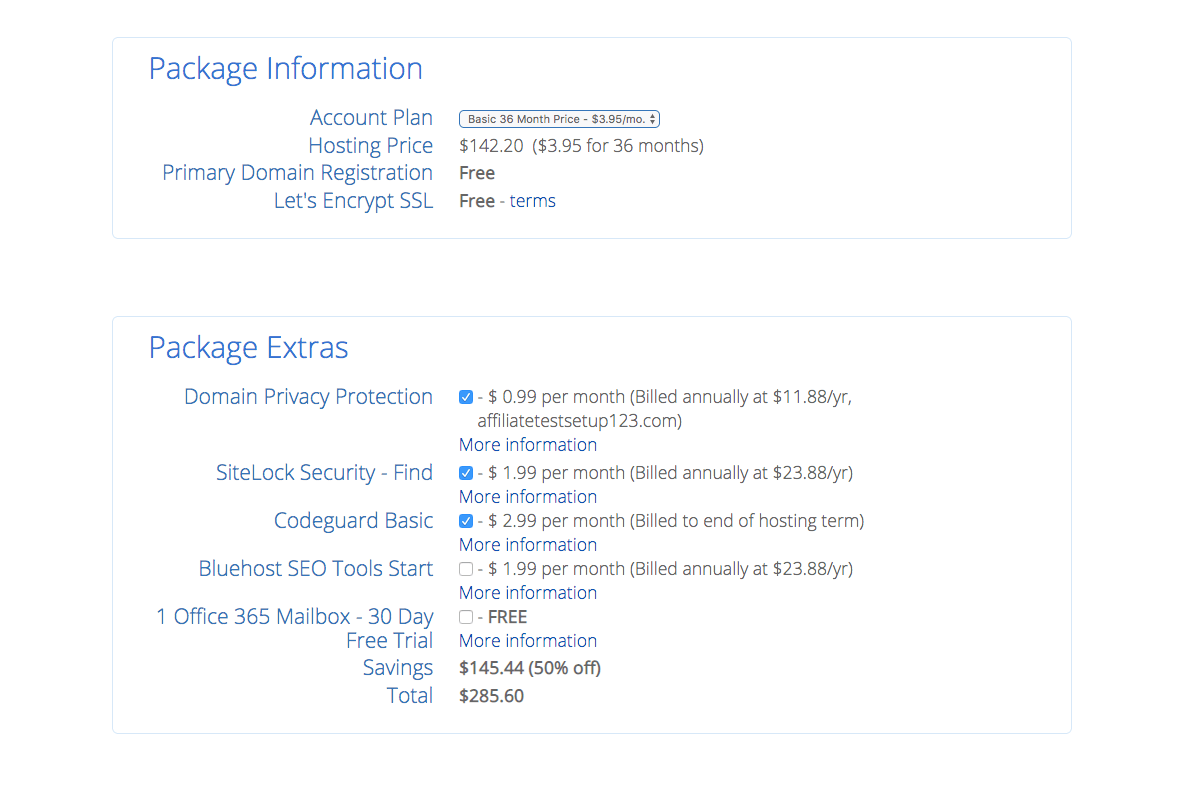
e. Choosing the right package
With Bluehost, you get three options under “Account Plan”, you can choose for 1 year, 2 years, or 3 years. I advise clients to just go for three years as this is cheaper in the long run. It also reinforces your commitment to your travel blog.
You can easily skip all the package extras. I sometimes get Domain Privacy Protection to save the client from all the promotional emails you get when you register a new domain.
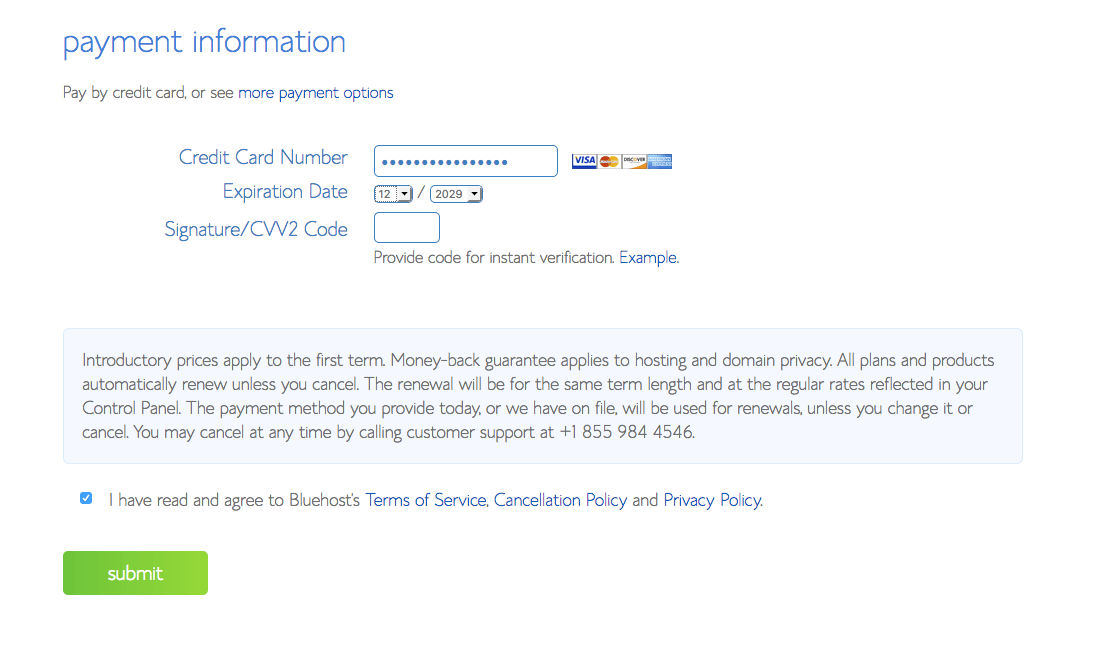
f. Make the Payment
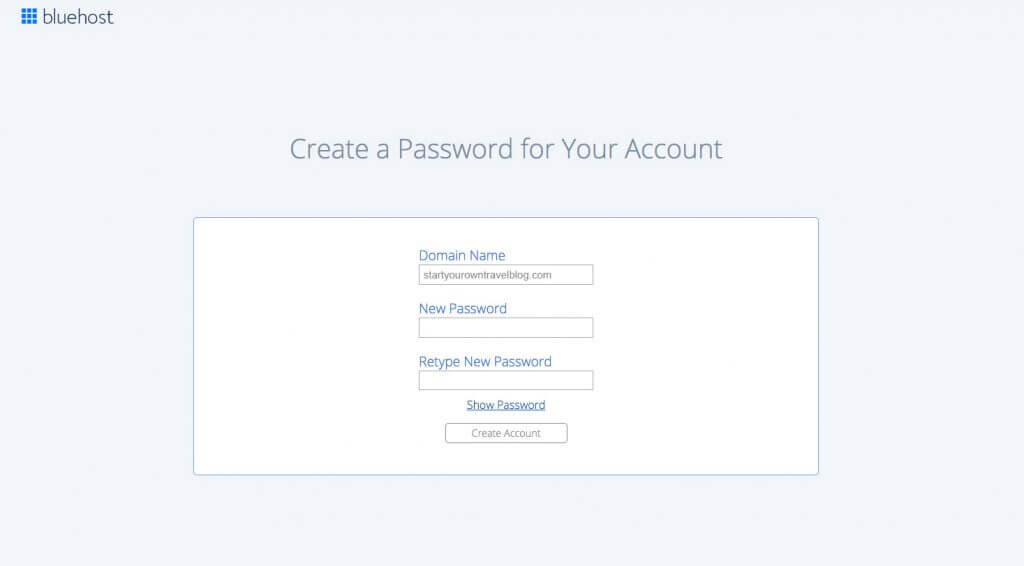
g. Creating your password
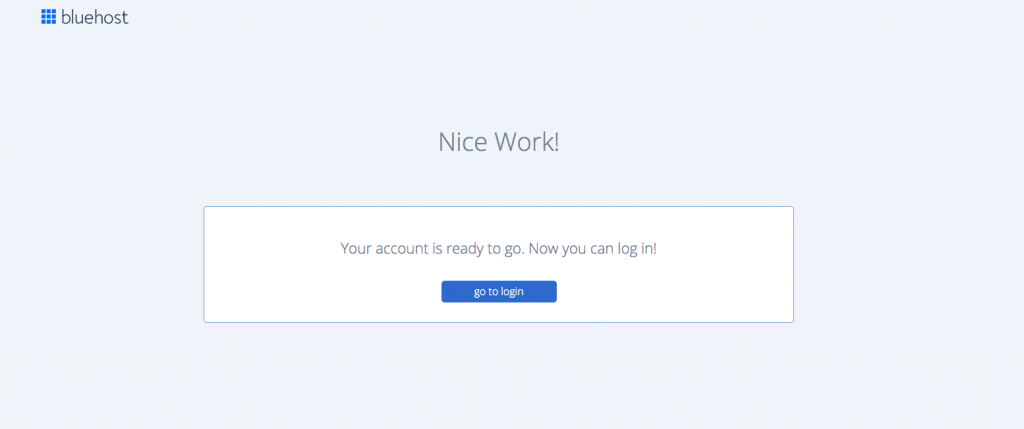
Once you have made the payment, you will be presented with the screen to create a password. Pretty straight forward, go ahead and create the password.
Step 3: Installing WordPress
If you have made it this far, congratulations! We are going to start building your site now, and we start with WordPress.
WordPress is a completely free publishing platform used by major publishing houses like The Tech Crunch, Vogue, The New Yorker, several Fortune 500 companies, and now you :).
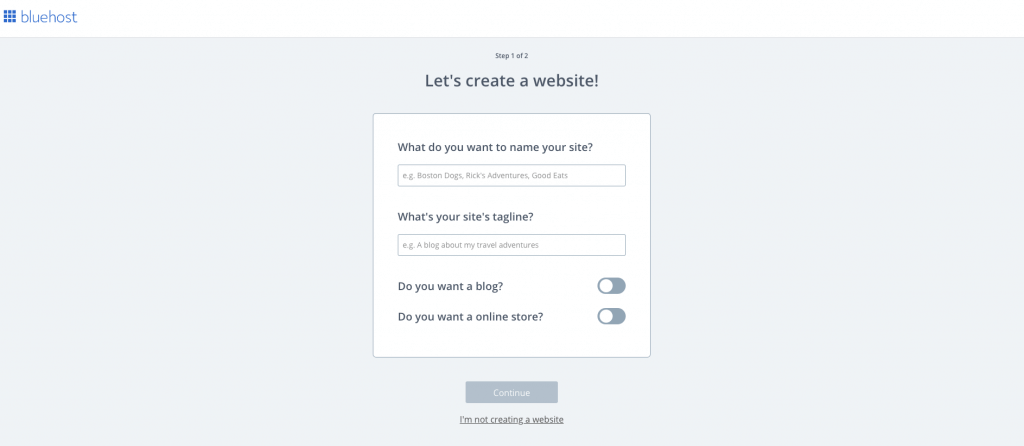
BlueHost will automatically start the process. We just have to follow the on-screen instructions. To start with, give your site a name and a tagline. Check the option that says “Do you want a blog” and uncheck the option that says “Do you want a online store”
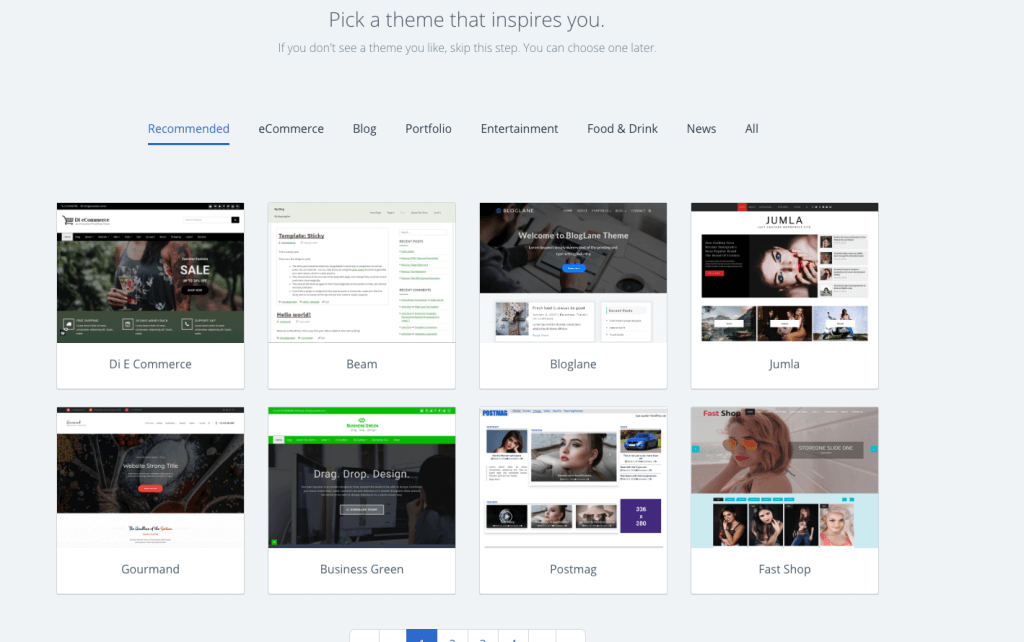
Now BlueHost will ask if you want to choose a theme, you have to choose one to move this step forward, but don’t really worry about this, as we will be able to change the theme any time we want to.
That is it! We are done 🙂

Step 4: Designing your blog
Now that you have successfully installed WordPress, it is time to login to your dashboard (again). Go to http://yoursitename.com/wp-admin
Your username and password would have been emailed to you by Bluehost,
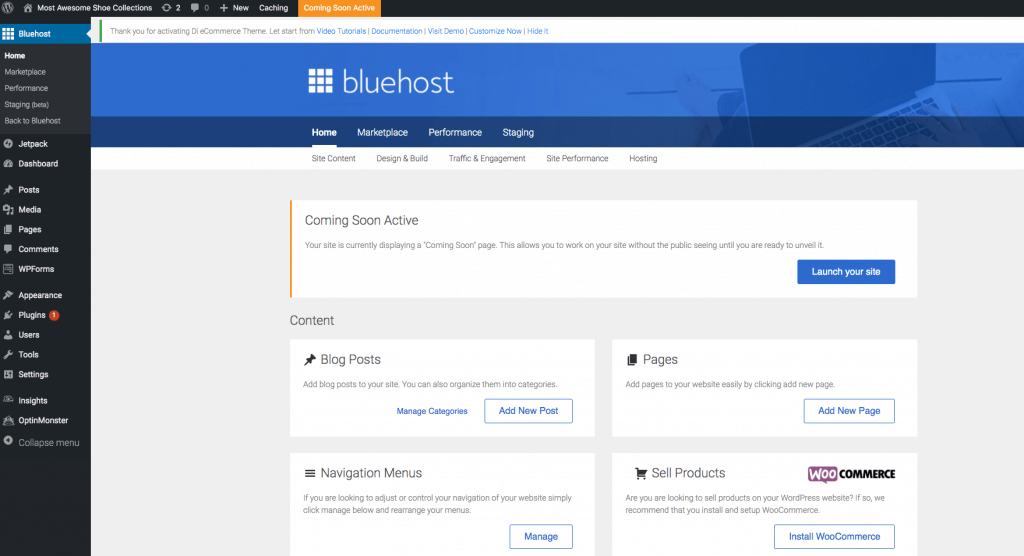
This is where you manage your sites, the main options are on the left hand side. This is where you will manage your Posts, Pages, Comments and your other Settings. You can change your appearance by changing your “theme” which can be found under “Appearance”. Another important section is Plugins, I will be discussing that shortly.
Posts: Whatever you post will go on the home page of your site one after the other, the newer one will be on top, like any other blog.
Posts are divided into categories and can have tags for finding them easily. Remember to add categories (like Travel, Food, Stories), or your categories can be based on location as well, “Asia,” “India,” etc. You can have multiple categories for a post, just like you can have multiple tags
Pages: These will appear on the top navigation of your site, this is where you create pages on the site like “About Me” and “Contact Me”, etc.
Comments: This is where you will manage the comments people leave on your blog. There will be MANY, and be careful about spam as well.

a. Designing Your Blog
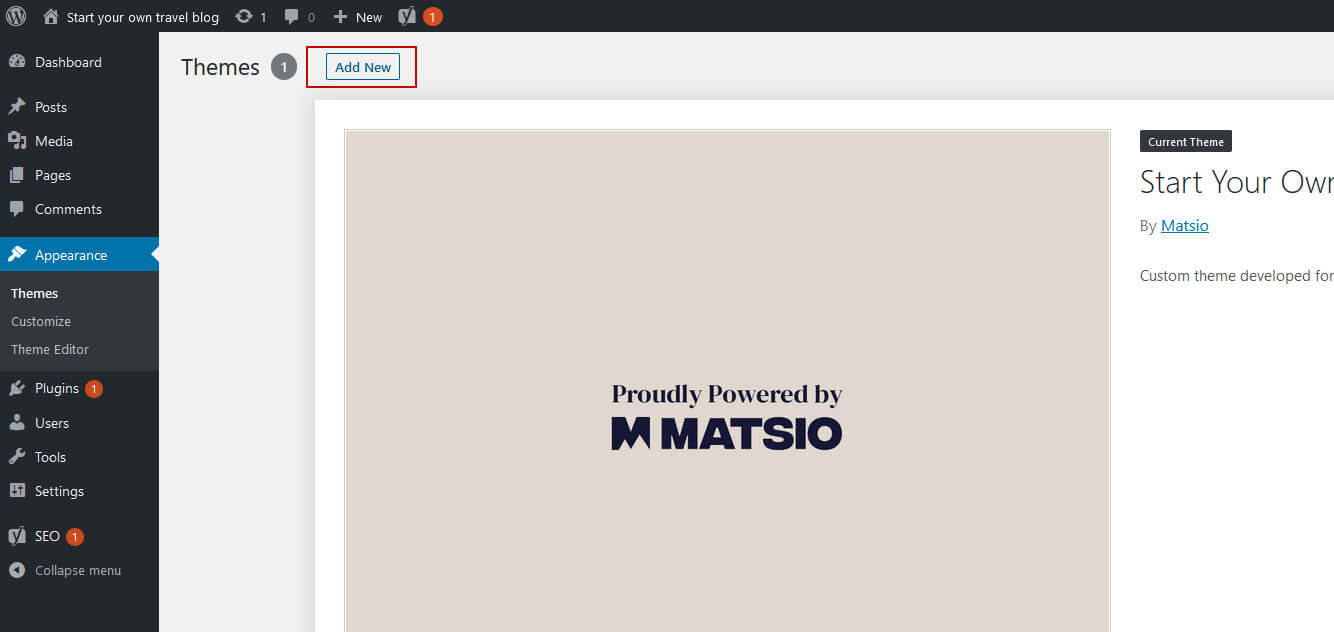
First of all, congratulations, now you have an official site. Now we can start the design your travel blog. To start, you will go to Appearance on your blog’s backend and select “Themes” and click on “Add New” at the top. I have highlighted the button in red for your reference.
This will bring up a selection of themes from the WordPress theme library, and you can select the one you like and install, you can easily spend hours browsing these themes, my recommendation is to go with the first one you think is “Not Half Bad!” since you can change this any time you want.
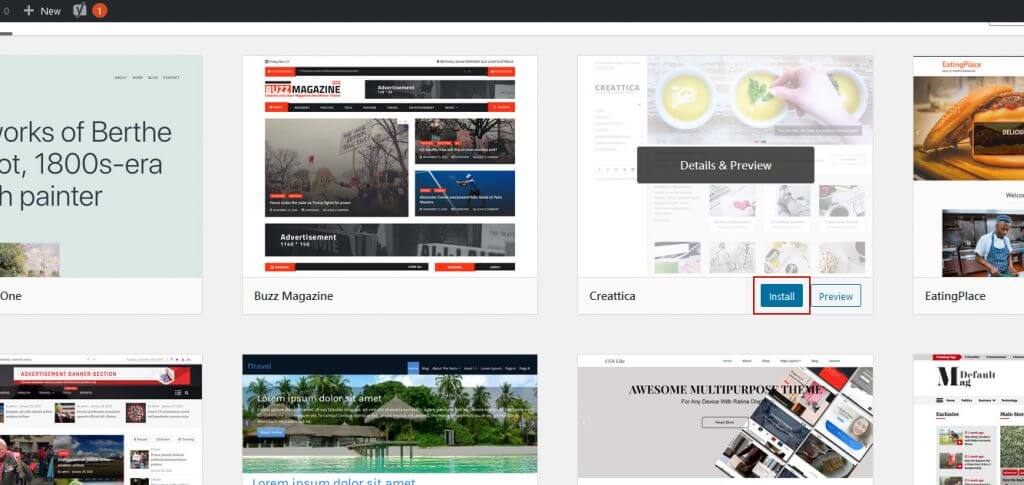
Follow the on-screen instructions to then install and activate your theme, now if you go to your http://yoursite.com, you should see the site with the new theme installed.
What if you can’t find the amazing design you are looking for in WordPress’s free theme library? Then you can always buy a professional theme (See my notes on this below)
b. Get A Logo
You need a logo for your new website, which will become part of your brand identity. There are a couple of ways to go about this.
- Make One
If you are handy with tools like Photoshop or Illustrator, you can go ahead and create one. - Use Canva
Since most people aren’t that tech-savvy, I recommend making one on Canva which is a tool you should be using for your blog to create banner images anyway. - Hire a freelancer for cheap
You can get a logo done for as low as $5 on sites like Fiverr. This is by far the best option to get a logo designed and I use it frequently.
c. Essential Plugins
So plugins are tiny pieces of code that you can add to your site to enhance its functionality. WordPress comes with a ton of useful features, but still, we find ourselves needing some additional things now and again. Thankfully WordPress has a lot of free plugins that we can use. To install a plugin, go to the backend, click on “Plugins” and then on “Add New” – It is the same as themes, once you find the plugins you want, you just Install and Activate them.
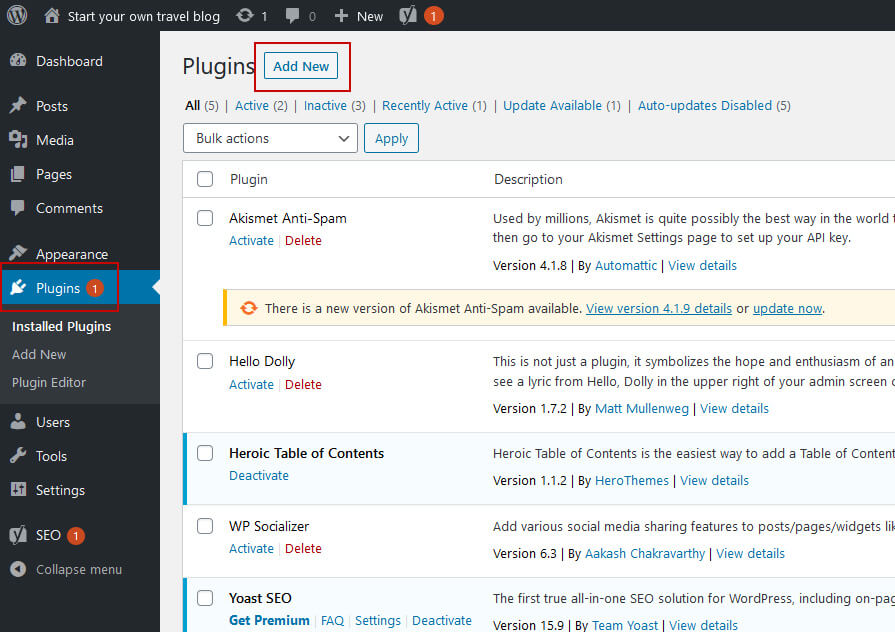
The following are the list of plugins that you need and why you need them.
- Akismet
As soon as spammers know that you have a new site, they will come and comment spam stuff on it. Why? Because spammers gotta spam. Akismet checks your comments and contact form submissions against their global database of spam to prevent your site from publishing malicious content. - Yoast SEO
The number one WordPress SEO plugin available today, I can’t remember the last time I made a site without it. Go ahead and install it to make it easier for Google to rank your page. - Contact Form 7
There are several contact form plugins available. This is one of the best free ones. - MailChimp for WP
One can not overstate the importance of having a mailing list when you start your new blog, even today, start building your email list on day one with MailChimp. - Google Analytics
Google Analytics is a free service by Google that helps you track how many people visited your site, and how much time they spent on it and where they are from. Google Analytics is important. These numbers are often asked by advertisers and brands when they want to work with you. This is one of the best Google Analytics plugin there is. It shows the important data metrics on your dashboard. - Cookie Notice & Compliance for GDPR / CCPA
You don’t need this if you are not in EU. “Cookie Notice” provides a simple, customizable website banner that can be used to help your website comply with certain cookie consent requirements under the EU GDPR cookie law and CCPA regulations. - Simple Social Media Share Buttons
This plugin adds social media sharing buttons to your WordPress sites, such as: Facebook, WhatsApp, Viber, Twitter, Reddit, LinkedIn and Pinterest. It also comes with lots of options like Sidebar, inline, above and below the posts content, on photos, popups, fly ins. - AMP for WP – Accelerated Mobile Pages
You might have seen that lightning bolt icon near articles shared in Facebook. This means that the page will load really fast on mobile using a technology called AMP. This plugin automatically adds Accelerated Mobile Pages (Google AMP Project) functionality to your WordPress site.
Step 5: Your First Post
So you have a beautiful blog now, along with all the essential plugins, and you are just ready to start being a blogger and earn those dollars. Let’s write your first post. Here’s a helpful video I found online, there are several others available as well to help you make your first post.
a. The First Post
Time needed: 5 minutes
How to write your first post
- Finding the editor
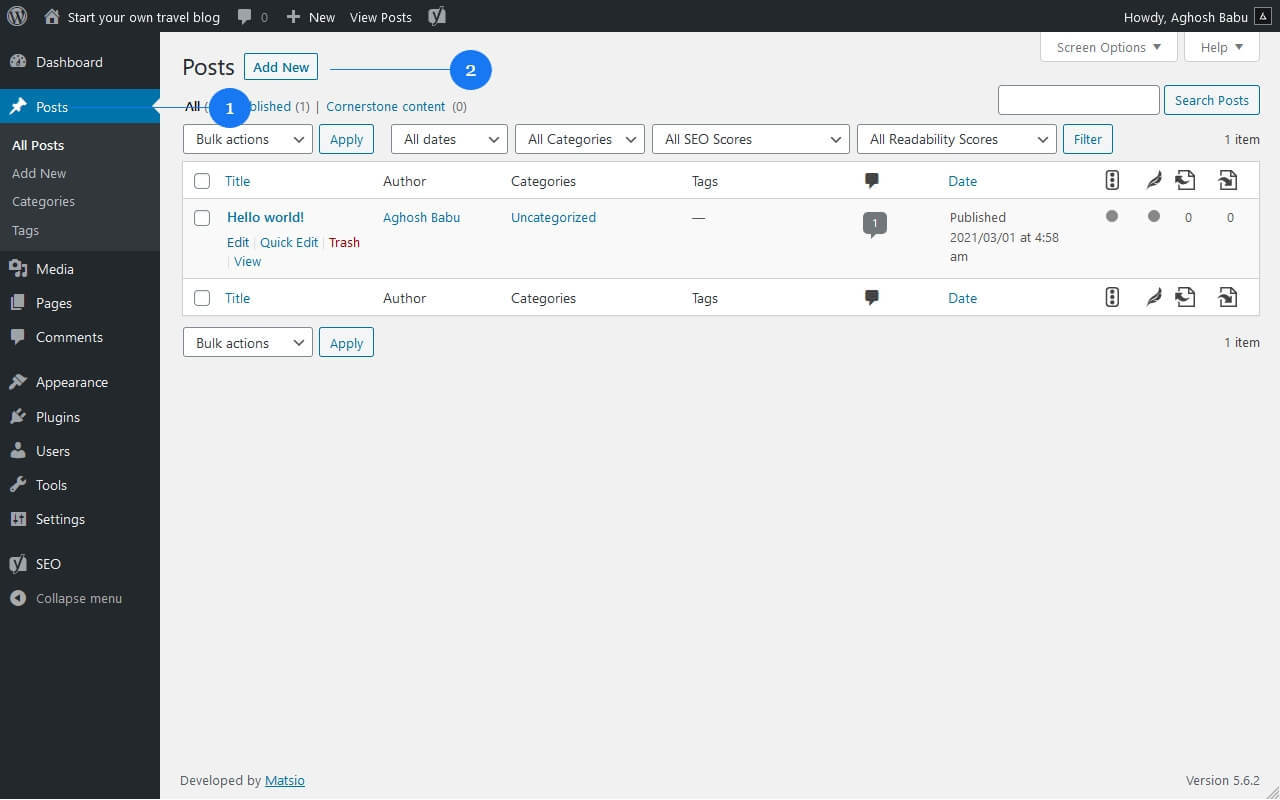
If you haven’t already, you will login to your WordPress backend and on the left hand side, you will find a heading called “Posts“, when you click on it, you will see a list of all your posts. You will see that WordPress has very helpfully added a sample post called “Hello World!“. You can either edit or trash that post. You can create a new post by clicking on Add New marked as 2 in the figure.
- Give it a title and go!
Give it a title, say what you want to say to the world about your first post, I have marked the areas to write the title and body copy as 1 and 2 in the image and don’t forget to set a picture to represent the post, which you can do by clicking 3, labelled “Set Featured Image”
In the body copy you can add images, tweets, Instagram posts, YouTube videos and a whole lot of rich text content to make your blog post all the more engaging.
- Publish!
Once you have added all the content, you can hit publish and you will see it on the home page of yoursite.com. Happy Publishing!
b. Your About Page
You can find a section called “Pages” similar to your “Posts” where you can create a page, it is exactly like creating a post, but it will appear on your main navigation on the top of your site (on all pages). Write about yourself so new visitors can get to know you!
c. Have a Contact Me page
This is very important. People will want to advertise on your blog as it becomes popular, please list out ways to contact you on your contact page so they can easily find you.
d. Install and Configure Google Analytics
You have to create an account in Google Analytics to start monitoring the traffic that comes to your site. You should have this from the get-go. I had previously listed a plugin that will help you connect your blog to your Analytics account, but to do that you will have to first set up an account in GA. This is fairly straightforward, numerous guides are available online to help you with this.

Step 6: Building an Audience
So, you have a shiny new blog, and your first blog post is ready. The only thing missing now is the audience. This is the tricky part, and most people abandon their dream of becoming a travel blogger because of this. Fortunately, there are numerous ways to drive traffic to your blog and create a loyal audience, and it is actually easy.
Basically, you need to establish two key objectives to ensure a steady traffic drive to your blog:
Grow your blog’s audience
If you are looking to get more people to visit your blog, you need to increase your reach. With the right tactics, you can drive more traffic and accelerate your blog’s growth. Below are some of the tactics that can help grow your audience faster.
1. Create content that connects with your target audience
Before you get all excited and start your writing process, you should first figure out who you are writing for, as in who is your target audience. When you start posting content that your target audience is interested in, it will automatically increase your readership. Do this consistently, and those readers will come back for more.
By using tools like SEMrush, you can find out the keywords other travel bloggers are using and add them creatively in your content to get a better position in the search results. This may sound too technical, but it is very helpful in getting your content a better reach.
2. Network with other bloggers regularly
Developing solid relationships with other bloggers not only gets you more traffic, shares, and engagement but also allows you to figure out the different ways in which you can help each other.
The easiest way to engage with other bloggers is through social media. You can share their content, comment on their posts, and even DM them. Adding helpful comments on other blogs and responding to comments from other bloggers will help you become an active member of the blogging community. Sub-reddits, Facebook groups, and other online forums are also a great way to connect with other travel bloggers.
3. Guest posts on top blogs in your niche
How can posting on other people’s blogs help you grow your audience?! It’s quite simple, actually. The top blog in any niche will be the ones with the most number of visitors. When you write for such blogs, their audience will start to notice you as a reliable voice and visits your travel blog for more content from you. Besides that, it will help you establish a better connection with the top travel bloggers as well.
Don’t hold yourself back when it comes to guest blogging. Promote each post as you would promote one on your blog and respond to people who leave comments.
4. Use social media to promote the post
Sharing your blog post on social media and promoting it can get you a considerable number of visitors. However, if you are looking for steady traffic, then you should look for ways to encourage more social shares from your visitors. The more people share your content, the more new readers will visit your blog.
Bring your audience back for more
Once you start getting a steady growth of visitors, the next step is to ensure that they keep coming back. Here are some of the ways through which you can get your audience you come back.
1. Give the visitors a good experience
Providing good content is one thing, but doing it with a good visitor experience can make your blog more memorable. If you are wondering how you can give the best experience for your visitors, here are a few things to get you started.
- Provide valuable content in a creative and unique way. This can be done through catchy headlines, beautiful images, or funny descriptions.
- Remove anything that doesn’t have a purpose. It can be a sidebar, footer, or badge.
- Make necessary changes even after you publish a post. Based on how posts are performing, you can change parts of the post to make it perform better.
2. Build an email list
Building an email list can help you keep your audience in the loop. This means they can be informed about your new posts on a regular basis. You can encourage visitors to subscribe to your email list by making the process insanely easy and simple. Offering a hyper-relevant ‘opt-in bribe’ is also a good technique to get sign-ups.
3. Ask your audience to follow you on social media
Perhaps the easiest way to notify your audience about a new blog post is through your social media channels. Don’t hesitate to ask your visitors to follow you on social media. Sometimes all you need is to simply ask.
Step 7: Monetizing your site
Many blogging enthusiasts believe that you need a large audience to even think about monetizing. I don’t believe this to be true. Over the years, I have seen many of my clients earn money regardless of their growth or number of visitors. The key is to have engaging and recurring audience and money will follow. Some of the most effective ways to get started.
You need to understand one fundamental truth about the travel/hospitality industry – there are a lot of businesses ALL over the world who can benefit from your blog. There is a hotel in Bangalore, India or Bali, Indonesia that could both benefit from an article you wrote about them. How you sell your services to them is up to you, but your target market for monetizing your blog is huge, all you need to do is to leverage it.
AdSense
We all might have heard about Adsense before. It is one of the most common and easiest ways of earning money through advertising. You can create an account, enter the ad settings, and paste the AdSense code in your post. I recommend that you try out different banner sizes and ad placements and see which one works best. With enough placements, you can easily earn up to $1 for every 1000 visitors.
Amazon Associates
Affiliate marketing can be another revenue-generating source for your travel blog. Since you are a beginner, Amazon Associates will be the best choice. Let me explain to you how it works. When you mention a product on your blog, you can add an affiliated link to the product. If a reader clicks on the link and chooses to buy something, then you will get a commission for that sale.
Other affiliate programs
Similar to Amazon Associates, there are many affiliate marketing options available to start making revenue from day one. Travel insurance, hotel booking, and flight booking are some of the popular options fit for travel blogs. Just make sure that you don’t go overboard and stuff a lot of affiliate links into a paragraph and never sell anything you don’t personally use/recommend. If you recommend one bad product, you’ve lost your reputation with that reader and their friends. You don’t want to do that.
Frequently Asked Questions
Whenever possible, go with .com. Why? Because it is easier to remember and gives it more credibility. I actively tell my clients to avoid certain top level domains such as .xyz for credibility reasons.
Never. Someone once asked if the industry was saturated. If you think that you’re vastly underestimating the size of the travel and hospitality industry. Can you guess just about how many people are looking for itineraries to go to India or Bali? And the sheer number of hotels/ restaurants /transportation networks that services these people? Now compare that to the number of bloggers blogging about these places! Each of these businesses can benefit by partnering up with a travel blogger (you!) to promote their business.
Yes! The answer is surprisingly a strong and resounding yes. You can blog about a lot of things between your journeys, you can blog about your research prior to travel, your plans and preparation, get feedback on your itinerary.
You can also blog about where you live for the benefit of those are planning to come there, or places you have been to or are nearby. This is huge because who knows your place like you do!
Fun anecdote: During its peak, Gilmore Girls inspired a lot of people to find quaint towns like Stars Hollow for vacationing!
You can spend any amount of money on this – this is completely up to you. You can start for as low as $60 for a professional blog.
A couple of reasons, one, they are considered amateur blogs and do not generate money. In fact, some of these platforms will not let you put your own ad codes and instead put theirs so they can money off of your content. The free option doesn’t let you put in your own domain name, so your site name will be something like yourname.wordpress.com or similar.
Another reason, when was the last time you saw a .blogspot.com or .wordpress.com result coming up in a Google search? They rank way below regular websites
Can you imagine building your readership in a free service like that and getting denied when you approach a brand to do business with them? It is entirely possible.
About The Author
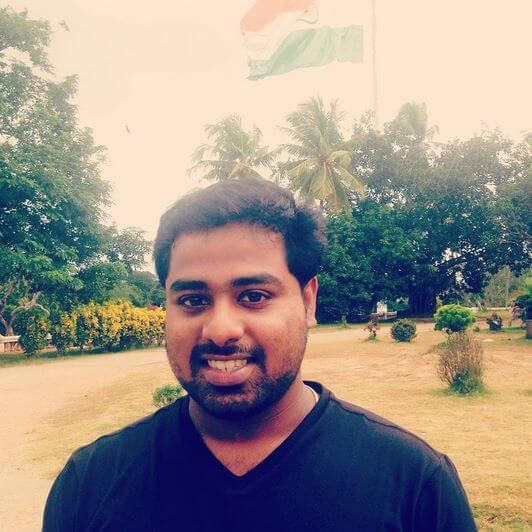
Aghosh Babu is a Web & WordPress Developer from Kerala, India. Aghosh started freelancing as as web developer at the age of 14 in 2004. He has since then worked with several notable bloggers including the millionaire travel blogger Johnny Ward. Aghosh has built several websites and travel blog over the years. You can read his full bio and connect with Aghosh over LinkedIn here.
Got Stuck? Get help!
When I first started out in WordPress a random stranger from a message board helped me setup my first site. This was in 2004. I wish I remembered his name and since I’ve been able to help people with WordPress I’ve always tried to help people out in any way I can. If you were following this specific guide and got stuck at any point and need help, you can reach out to me here. Please note that I get several requests at a time and I am offering this service for free, so it is a first come first serve basis. Please send all the required information and the exact step where you got stuck.
What are your thoughts?!
Ok, I did not expect this to be such a detailed guide, of all the travel blogging guides, this is the only one that starts with a WHY and I love that!
I have done all the above and lot more but the traffic still eludes me. Lol Great content nevertheless
Hi Sandy, I checked out your website, I think may be I can help! Please reach out to me via LinkedIn!
Great article