How to Install WordPress on Bluehost (Step by Step, 2026)
On this page
Right, let’s get one thing out of the way first: installing WordPress on Bluehost takes about ten minutes, and most of that is typing your card number. Honestly. When you buy a Bluehost plan in 2026, WordPress gets installed for you automatically on the domain you picked at checkout. You then log in to your Bluehost account, go to Websites, click Edit Site (or WordPress Admin), and boom… you’re standing inside your blog’s dashboard. On a different host? Same job, one of two routes: a one-click installer like Softaculous or WP Toolkit in cPanel, or the old-school “5-minute install” where you upload WordPress yourself. I’ll walk you through all three below, then the ten settings I change on every fresh install before I write a single word.
Key takeaways
- On Bluehost, WordPress installs itself during signup. No downloads, no databases, no faff.
- Your dashboard lives at
yourdomain.com/wp-admin. Bookmark it now. The Bluehost portal is just a slower shortcut to the same place. - On any cPanel host, use Softaculous or WP Toolkit (look under Software). The manual install is only for when neither one exists.
- Before you publish anything, sort five things: permalinks, timezone, the “discourage search engines” checkbox, the sample content, and a static homepage.
- Skip the bundled extras (WooCommerce, page builders, “Bluehost Marketplace” plugins). A travel blog needs a theme and about eight plugins. That’s it.
- You cannot break your hosting from inside WordPress. Worst case, you reinstall and lose ten minutes. So relax.
This is step four of my full step-by-step guide to starting a travel blog. Haven’t picked a host yet? Read what I actually recommend for travel blog hosting first. And if you’re still dithering over a name before you buy, my travel blog naming guide will stop you registering something you’ll cringe at in six months.
What you need before you install WordPress (not much, promise)
Three things. Only three:
- A domain name you’re happy with. Bluehost throws one in free for the first year on its shared plans; on other hosts you’ll probably buy it separately (roughly $10–$20/year, check the current price).
- A hosting account. Shared hosting is fine for a new blog. Proper fine. You won’t outgrow it for a long time. I break down exactly what a travel blog costs in the first year in a separate post, but expect around $3–$12/month depending on host and term.
- A password manager (Bitwarden is free, or your browser’s built-in one). You’re about to create three passwords in a row: hosting, WordPress admin, and email. Don’t reuse one. Please.
You don’t need to download WordPress from wordpress.org unless you’re doing the manual install in the last section. You don’t need FTP software. You don’t need to know what PHP or MySQL is. I’ve built more than two hundred WordPress sites and I STILL use the one-click installers when a host offers them, because they do the boring bits correctly and I’d rather spend that time on something that makes money.
How to install WordPress on Bluehost (the 2026 flow, not the old screenshots)
Bluehost has redesigned its signup and dashboard over the last couple of years. So if you’re following an older tutorial with screenshots of a blue cPanel and a big “Install WordPress” icon… that’s not what you’ll see, and I get emails about this every week. Here’s the current flow. Bluehost fiddles with button labels constantly, so treat the names as roughly right and the sequence as gospel.
Step 1: Choose a plan and create your account
Head to Bluehost (affiliate link — I earn a commission at no extra cost to you) and grab the cheapest shared WordPress plan. In 2026 the Basic plan is advertised at around $2.95–$3/month on a multi-year term and renews at roughly $9–$12/month, so check the current price and actually read the renewal line before you click. One site is all you need. You can upgrade later without reinstalling a thing.
Bluehost will push the 36-month term hard, because it makes the monthly number look tiny. Here’s the honest bit: if money’s tight, 12 months is fine. You lose a little on the headline rate, but you keep your options open. Nobody’s going to judge you for that.
Step 2: Pick your domain (or skip it for now)
You’ll be asked to register a new domain, use one you already own, or “choose later.” Registering right here is the easy route, because Bluehost sets up the DNS for you. Already own the domain elsewhere? Type it in; Bluehost will show you the two nameservers to paste into your registrar later (they look like ns1.bluehost.com and ns2.bluehost.com). Still can’t decide on a name? Pick “choose later” and you get a temporary address to build on. Don’t let the name hold you hostage.
Step 3: Account info and the extras screen (untick, untick, untick)
Fill in your name, address and email. Use an email you actually check; your renewal notices and password resets land there. Then comes the “package extras” screen. Untick everything except domain privacy if it’s offered free. SiteLock, CodeGuard, “SEO tools” and the premium email add-on… a new blog needs none of them, and I show you free equivalents in the only plugins a new travel blog needs.
Pay, then set your Bluehost account password on the next screen. That’s password number one. It’s for your hosting account, not your blog. Two different things.
Step 4: The guided WordPress setup (and what to skip)
After payment, Bluehost drops you into a guided onboarding. As of 2026 it’s an AI-assisted wizard (Bluehost calls the current version WonderStart in its help material) that asks what kind of site you’re building, suggests a name and tagline, offers a handful of starter designs, and previews colors, fonts and a homepage layout. Behind the curtain it’s installing WordPress on your domain, applying a Bluehost block theme, and pre-loading a few plugins and starter pages like About and Contact.
My advice? Answer the questions honestly (“a blog,” “travel”), pick any design, and get through it. Do NOT spend twenty minutes on colors here. You’ll replace the theme anyway with one of the themes I recommend for travel blogs, and everything the wizard makes is ordinary WordPress content you can edit or bin. See a “skip” option? Take it. Skipping still installs WordPress; it just leaves you with a blank site, which is exactly what we want.
Step 5: Find your site and open the WordPress dashboard
Log in at bluehost.com. In the left sidebar of the account manager, click Websites (older accounts still say My Sites). You’ll see a card for your domain. Click Edit Site or the WordPress Admin button and a new tab opens with your WordPress dashboard, already logged in. Bluehost creates your first WordPress admin user from your Bluehost login details, so the credentials match to begin with.
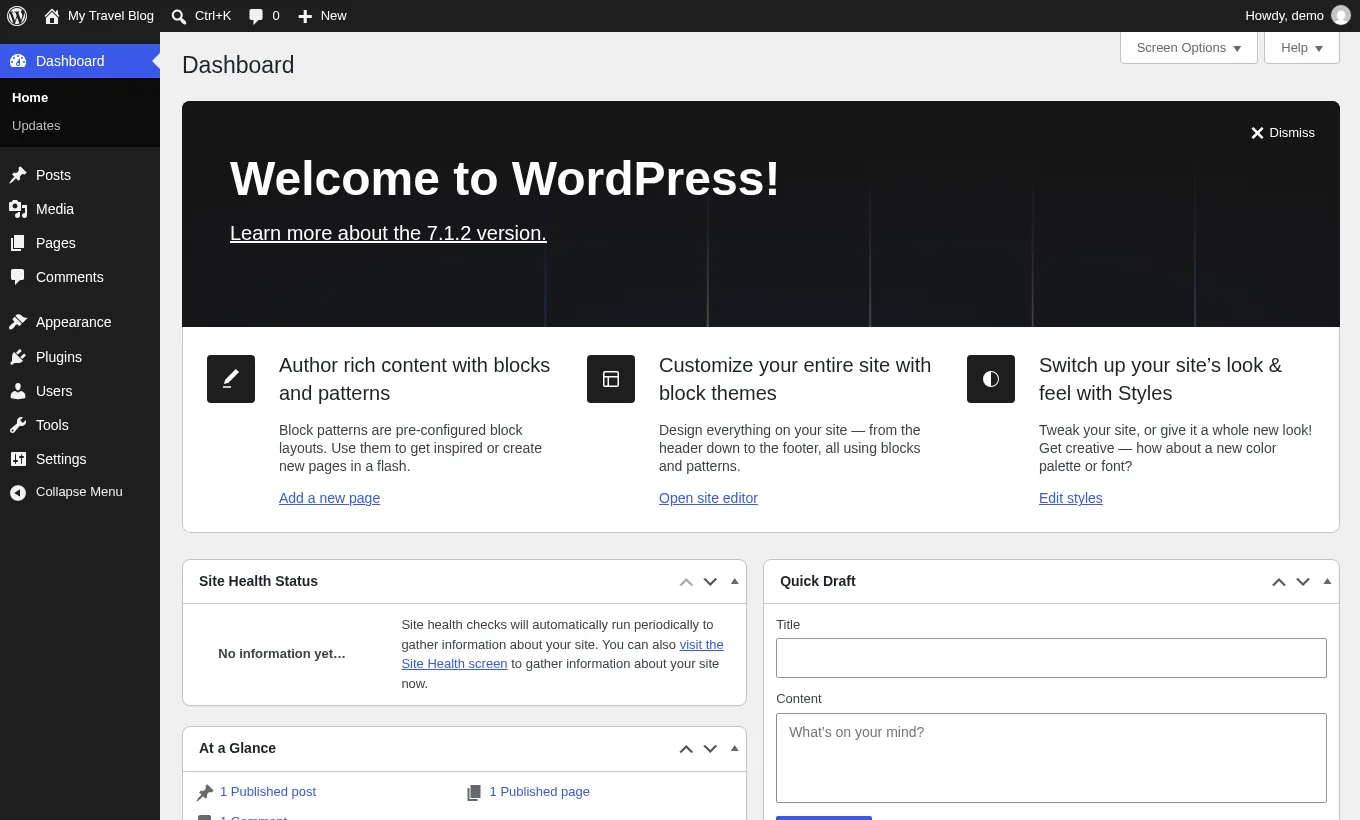
Now do two things straight away. First, go to Users → Profile in WordPress, scroll to “Account Management,” and generate a new, separate password for WordPress (password number two). Second, bookmark yourdomain.com/wp-admin. That URL is your real front door. The Bluehost portal is just a shortcut, and a slower one.
Step 6: Check the SSL padlock and that your domain actually resolves
Open your domain in a private browser window. You want a padlock and https://. Bluehost issues a free Let’s Encrypt certificate automatically, but it can take up to an hour after the domain goes live. Brought a domain from elsewhere? DNS changes can take a few hours to propagate, and until then you’ll see a Bluehost placeholder or your registrar’s parking page. Make a coffee. Do not reinstall anything. I mean it.
Still no padlock after a day? Go to Websites → Settings → Security in the Bluehost portal and toggle the free SSL on, or open Bluehost’s live chat and type “please enable the free SSL on my domain.” That one sentence sorts it 95% of the time.
How to install WordPress on any cPanel host (Softaculous or WP Toolkit)
Most other shared hosts (Hostinger, SiteGround, Namecheap, A2, GreenGeeks, most local hosts) give you cPanel or something similar with a one-click installer. There are two common ones and they do the same job. Here’s exactly where the buttons are:
- Log in to cPanel. The link is in your host’s welcome email, usually
yourdomain.com/cpaneloryourdomain.com:2083. - Scroll down to the Software section. Click Softaculous Apps Installer or WP Toolkit, whichever you’ve got. Both there? Either works; WP Toolkit is a bit nicer for updates and staging later on.
- Click WordPress, then Install (Softaculous) or Install WordPress (WP Toolkit).
- Choose protocol:
https://. If https isn’t offered, install with http and fix the SSL straight after. Don’t leave it for weeks. - Choose domain: your domain. In Directory: leave it blank. If it says “wp” in the box, delete it, or your blog will live at yourdomain.com/wp. That’s the single most common mistake I see, hands down.
- Site name and description: your blog name and a one-line tagline. Both changeable later, so don’t agonize.
- Admin username: anything except “admin.” Admin password: hit the generator. Admin email: yours.
- Ignore the “select plugins” and “select theme” checkboxes. Untick anything pre-ticked (usually a page builder or a security plugin you never asked for).
- Click Install. Wait 30 to 60 seconds. You get two links: the site and the admin URL. Bookmark the second one.
One Bluehost-specific note: Bluehost still gives you cPanel on shared plans (Websites → Settings → Advanced, or the cPanel link in your account), and Softaculous is sitting in there, but you should never need it for your main site because WordPress is already installed. It’s only useful if you want a second WordPress install on a subdomain later.
The manual “5-minute” WordPress install (when there’s no installer at all)
Some cheap or specialist hosts have no installer. The manual route is older than most of my clients, but it still works exactly as written up on wordpress.org’s installation guide. Budget twenty minutes the first time. It’s called the 5-minute install by people who’ve done it fifty times.
1. Create a database and a database user
In cPanel, open MySQL Database Wizard. Create a database (call it anything, e.g. travelblog), then a user with a generated password, then tick All Privileges and finish. Write down the full database name, the full username (cPanel prefixes both with your account name, like acct_travelblog), and the password. You’ll paste these exactly once.
2. Upload WordPress
Download the latest zip from wordpress.org/download. In cPanel, open File Manager, go into public_html, delete any placeholder index.html, and use Upload to drop the zip in there. Right-click the zip, choose Extract. That creates a folder called wordpress. Open it, select all the files, click Move, and move them to /public_html so the WordPress files sit directly in the web root, not in a subfolder. Delete the empty wordpress folder and the zip. Done.
3. Run the installer in your browser
Visit https://yourdomain.com/. WordPress notices there’s no configuration yet and shows you a language picker, then a form asking for the database name, username, password, host (leave localhost), and table prefix (leave wp_ or change it to something like tb_). Click Submit, then Run the installation. On the final screen enter your site title, admin username (not “admin”), a strong password, and your email. Click Install WordPress. That’s the whole thing. If the automatic write fails, WordPress shows you the contents of wp-config.php to create by hand in File Manager; copy, paste, save, refresh. Sorted.
How to log in to WordPress after installing (and what each URL is actually for)
Beginners get lost between four different logins. Sound familiar? This is the table I send every client on day one.
| Where | URL | Login used | What it is for |
|---|---|---|---|
| WordPress dashboard | yourdomain.com/wp-admin | WordPress admin user | Writing posts, themes, plugins, settings. 99% of your time. |
| Bluehost account manager | bluehost.com (Login) | Bluehost account email + password | Billing, domain, SSL, email accounts, opening cPanel, support chat. |
| cPanel | yourdomain.com/cpanel or via host portal | Hosting username + password | Files, databases, backups, PHP version. Rarely needed. |
| Domain registrar | Wherever you bought the domain | Registrar login | Nameservers and renewals. Only if the domain is not with your host. |
If /wp-admin throws a 404 later on, it’s almost always because a security plugin changed your login URL. Dig through your email for the “your new login URL” message that plugin sent, or rename the plugin’s folder via File Manager to switch it off. Not a disaster, just a faff.
WordPress settings to change right after installing (my 10-minute checklist)
A fresh WordPress is configured for a generic 2010-era blog. These changes take ten minutes, and every single one of them prevents a specific problem I’ve fixed for clients dozens of times. Do them now while the site is empty and nothing can go wrong.
1. Set permalinks to “Post name”
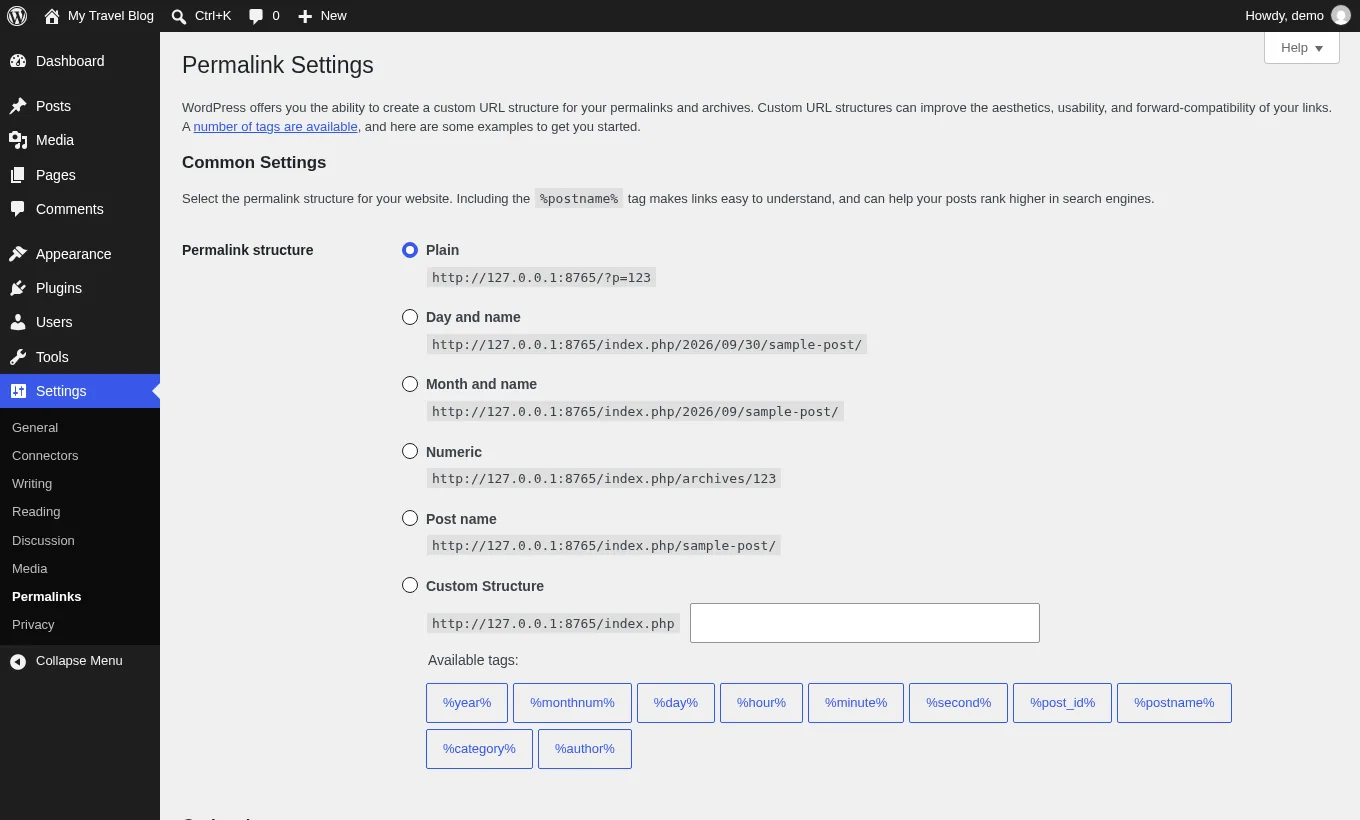
Settings → Permalinks → Post name → Save Changes. This makes your URLs read yourdomain.com/two-weeks-in-vietnam/ instead of yourdomain.com/?p=123 or some date-stamped mess. Do it before you publish anything, because changing permalinks later breaks every link you’ve shared and every pin on Pinterest. Most installers already set this, but check. Takes ten seconds.
2. Set your timezone, site title and tagline
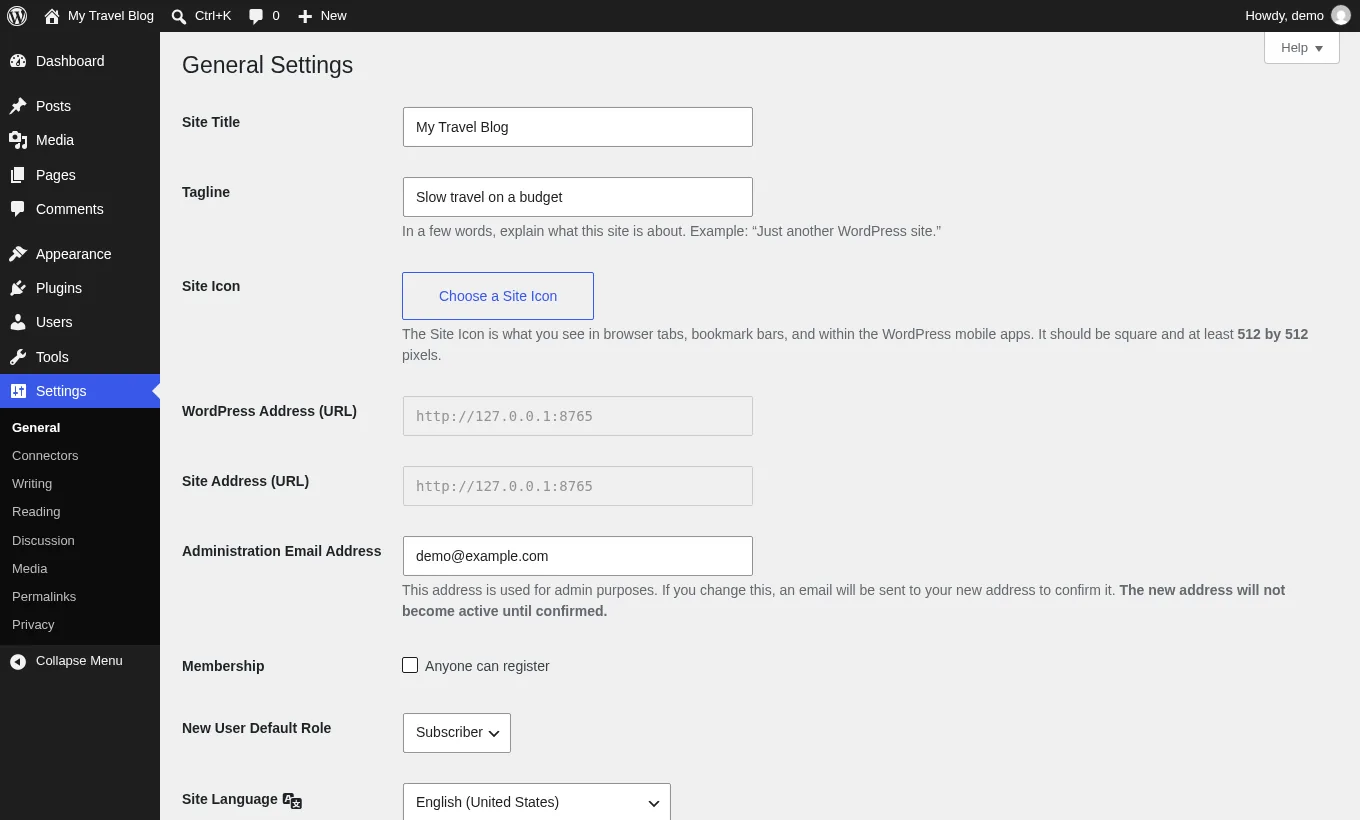
Settings → General. Pick your city under Timezone (not a UTC offset; cities handle daylight saving for you). Scheduled posts, “published 3 hours ago” labels and your analytics day boundaries all hang off this. Set Site Title to your blog name and Tagline to a short line about who the blog is for (“Slow travel in Southeast Asia for people with 15 days of leave”). Delete “Just another WordPress site” if it’s there; that’s what an abandoned site looks like to Google and to readers. And confirm both the WordPress Address and Site Address start with https://.
3. Make sure “Discourage search engines” is unticked
Settings → Reading → Search engine visibility. Some installers tick this box “while you build.” Then people forget. I’ve audited sites that were invisible to Google for eight months because of ONE checkbox. Eight months of writing for nobody. It should be unticked the day you publish your first post. If you genuinely want to hide the site while you set it up, use a maintenance-mode plugin for a week or two, then remove it; don’t rely on remembering to untick this later, because you won’t.
4. Delete the sample content
Every install ships with a post called “Hello world!”, a comment from “A WordPress Commenter,” a “Sample Page” and often a “Privacy Policy” draft. Go to Posts → All Posts, trash Hello world. Pages → All Pages, trash Sample Page. Comments, trash the sample comment. Keep the Privacy Policy draft though; you’ll finish it when you follow my guide to the legal pages every travel blog needs. If Bluehost’s wizard created demo pages or WooCommerce shop pages you don’t want, trash those too, and deactivate and delete WooCommerce unless you’re genuinely selling something this month.
5. Set a static homepage and a separate blog page
Create two pages: one called “Home” (leave it nearly empty for now) and one called “Blog” (completely empty). Then Settings → Reading → Your homepage displays → A static page, set Homepage to Home and Posts page to Blog. Now you’ve got a proper landing page you control, and your post feed sits at /blog/. Nearly every theme’s demo layout assumes this setup. You’ll build the Home page properly once your theme’s in.
Five more quick wins while you’re in Settings
- Discussion: tick “Comment must be manually approved” and untick “Allow link notifications from other blogs (pingbacks and trackbacks).” Spam bots sniff out new blogs within days. Not weeks. Days.
- Users → Profile: set “Display name publicly as” to your real name, not your username. Your username is half your login; don’t print it on every post.
- Plugins: delete Hello Dolly and any pre-installed plugins you didn’t choose. Deactivated plugins are still files an attacker can poke at.
- Appearance → Themes: delete every theme except the one you’re using and one default (Twenty Twenty-Five) as a fallback.
- Dashboard → Updates: run all updates now. Installers sometimes ship a version a few weeks old.
What to do with the plugins Bluehost pre-installs (keep, bin, or shrug)
Go to Plugins → Installed Plugins. What you’ll find depends on your wizard answers and what month it is, but here’s the usual cast and my honest verdict on each.
| Pre-installed item | What it does | Keep or remove for a travel blog? |
|---|---|---|
| The Bluehost plugin | Adds a “Bluehost” menu with setup steps, caching toggle, staging, and marketplace links | Keep for the first month; its staging and caching toggles are handy. Remove later if you prefer a cleaner admin. |
| Bluehost block theme / starter design | The theme applied by the onboarding wizard | Replace with a lighter theme from my themes guide. Keep Twenty Twenty-Five as a fallback. |
| WooCommerce (+ YITH add-ons) | Online shop | Remove unless you are selling physical or digital products right now. It adds weight to every page. |
| Jetpack | Stats, related posts, security, dozens of modules | Optional. Fine for stats in month one, but Site Kit + GA4 is the better long-term setup. |
| Contact form plugin (varies) | Contact page form | Keep if it is a lightweight one; otherwise swap for the forms plugin in my plugins guide. |
| Creative Mail / marketing add-ons | Email marketing upsells | Remove. Choose your email tool deliberately later. |
| Yoast SEO (sometimes bundled) | SEO titles, sitemaps, schema | Keep. It is what I use on this site. |
The rule I apply on every client site: if you can’t say in one sentence what a plugin does for your readers, deactivate it and delete it. You can reinstall anything from wordpress.org in thirty seconds, so there’s no risk here. Be ruthless.
Common mistakes when installing WordPress (and how to undo them)
- Installing into a subfolder. Your blog ends up at yourdomain.com/wp or /blog. Fix: in Softaculous, remove the install and redo it with the directory field blank. Do it now, before there’s any content to lose.
- Username “admin.” Bots try it first, every time. Fix: create a new administrator user with a different name, log in as that user, delete the old one and attribute its content to the new user when prompted.
- Two WordPress installs on one domain. Happens when someone runs Softaculous on a Bluehost account that already had WordPress. You get a “WordPress is already installed” warning or a broken homepage. Fix: remove the second install from Softaculous’s “All Installations” list.
- Mixed content (padlock with a warning). Site address saved as http. Fix: Settings → General, change both URLs to https, save, log back in. Padlock still moaning? Install a lightweight SSL plugin for a week to rewrite old links, then remove it.
- Leaving “Discourage search engines” ticked. Covered above. Check it today. Not tomorrow.
- Changing permalinks after publishing. Decide once, at install. If you really must change later, use a redirect plugin so old links keep working.
- Building the whole site in the host’s page builder. Bluehost’s wizard and loads of hosts push their own builder. Use the block editor that comes with WordPress. It’s faster, it’s the standard, and it won’t hold you hostage if you switch hosts.
How long does installing WordPress take, honestly?
The install itself: ten minutes on Bluehost, five on any host with Softaculous, twenty for the manual route. The post-install checklist is another ten. So you can go from “no blog” to “empty but correctly configured blog” inside an hour on a weekday evening, coffee break included while DNS propagates. Choosing a theme and writing your first post takes longer, and THAT is where your time should go. I’ve watched clients spend three days comparing hosts and then twenty minutes on their About page. Flip that ratio. The tech is the easy bit; the writing is the blog.
If you’re following the seven steps to starting a travel blog in order, you’ve now knocked out steps two, three and four. Nice one. Next up is design.
That’s it, you guys. Ten minutes of clicking and you own a corner of the internet that nobody can take off you. Don’t overthink it. If you get stuck on any step, or a button isn’t where I said it would be, email me and I’ll sort it with you for free. I got help from a stranger on a forum when I was starting out, and this is me paying that forward. Now go do step 1.
Frequently asked questions
Does Bluehost install WordPress automatically?
Yes, and it's the whole reason I send beginners there. Buy a shared or WordPress plan on Bluehost in 2026 and WordPress gets installed on the domain you chose at checkout, then a guided setup wizard runs. No downloading WordPress, no databases, no cPanel. Log in to Bluehost, click Websites, then Edit Site or WordPress Admin, and you're in your dashboard.
How do I log in to my WordPress site on Bluehost?
Two ways. The quick one: go to yourdomain.com/wp-admin and enter your WordPress username and password. The scenic one: log in to bluehost.com, open Websites in the left sidebar and click Edit Site (or WordPress Admin) next to your domain. Bookmark the /wp-admin URL. It's the fastest route and the one you'll use 99% of the time.
Where is 'My Sites' in the new Bluehost dashboard?
Bluehost renamed it, which is why the old tutorials confuse everyone. In the current account manager it's called Websites, in the left sidebar. Older accounts may still say My Sites. Both list your WordPress installs with buttons to open the WordPress admin, settings and staging.
How long does it take to install WordPress?
Honestly? About ten minutes on Bluehost including signup, about five minutes with a one-click installer like Softaculous or WP Toolkit on any cPanel host, and about twenty minutes for the manual install where you create a database and upload the files yourself. Add ten minutes for my post-install settings checklist and you're done inside an hour.
What settings should I change right after installing WordPress?
Five essentials, and I do them on every fresh install: set permalinks to Post name, set your timezone and site title under Settings > General, untick 'Discourage search engines' under Settings > Reading, delete the sample post, page and comment, and set a static homepage with a separate Blog page. While you're there, require manual comment approval and delete the themes and plugins you're not using.
Can I install WordPress on Bluehost using Softaculous or cPanel?
You can, but you shouldn't need to. WordPress is already sitting on your main domain. Softaculous in Bluehost's cPanel is only useful for adding a second WordPress site on a subdomain or add-on domain. Run it on a domain that already has WordPress and you get a duplicate install and a broken homepage, which is a mess I've cleaned up more than once.
Why does my new WordPress site say 'not secure' or have no padlock?
Patience, mostly. The free SSL certificate can take up to an hour to issue after your domain goes active, and longer if you've just changed your domain's nameservers. Wait, then check Settings > General in WordPress and make sure both URLs begin with https://. Still no padlock after a day? Ask Bluehost chat to enable the free SSL on your domain. That one sentence fixes it.
Some links in this guide are affiliate links. If you buy through them I earn a commission at no extra cost to you, which keeps the free help free. Full disclosure.
Keep going
Google Analytics 4 and Search Console for Travel Blogs
The 2026 setup guide for Google Analytics 4 and Search Console on a WordPress travel blog: about 45 minutes, costs nothing, and after that…
Legal Pages Every Travel Blog Needs (With Templates)
The privacy policy, affiliate disclosure, cookie consent, terms of use, copyright note and travel disclaimer every travel blog needs, with skeleton templates you can…
Free vs Paid Travel Blog: Which Platform Should You Pick?
The honest free vs paid travel blog comparison I give every client: ownership, ads, custom domains, monetization limits, SEO control, migration pain, and what…
Questions & answers
Entries tagged “Common question” are questions beginners ask me all the time; I’ve added them here with my answers. Everything else is from readers. Got one of your own? Ask at the bottom and I’ll reply.
Common question
I’ve forgotten my WordPress password and the reset email isn’t showing up. How do I get back into my dashboard?
Aghosh Babu Author
Easy one, and you don’t need the reset email at all. Log in to your Bluehost account instead (that’s the other password, the hosting one), click Websites in the left sidebar, and hit the WordPress Admin or Edit Site button on your site’s card. It opens your dashboard already logged in. No WordPress password needed. Once you’re in, go to Users → Profile, scroll down to Account Management, generate a new password and save it in your password manager this time! While you’re on that screen, check the email address on your profile. Nine times out of ten the reset email “never arrived” because it went to an old address or a typo, or it’s sitting in spam. If you’ve lost the Bluehost login as well, their live chat can verify you and get you back in.
Common question
I’ve published my first post but when I type my domain on my phone I still get a “coming soon” page. What am I doing wrong?
Aghosh Babu Author
Nothing. Your site is still in its pre-launch mode, which hides it from the public while you build. You see the real site when you’re logged in; everyone else (including you on your phone) gets the placeholder. Look for a “Coming Soon” notice at the top of your WordPress dashboard or inside the Bluehost menu in the left sidebar, and click the launch button or switch the toggle off. The label moves around between versions, so hunt for the words “coming soon” or “launch”. Then check in a private browser window. Still seeing it? Clear the cache from the same Bluehost menu and try again. And while you’re in there, pop over to Settings → Reading and make sure “Discourage search engines” is unticked, because the two often get left on together.
Common question
I picked “choose later” for the domain at signup and I’ve been building on the temporary address. How do I switch to my real domain, and will I lose what I’ve made?
Aghosh Babu Author
You won’t lose a thing. The temporary address is just a different door into the same site. Once you’ve decided on the name, log in to your Bluehost account, find the domains section, and register your free domain there. Then assign it to your website so it replaces the temporary address. The button labels change a lot, so if you can’t spot it in two minutes, open the live chat and type “please set my new domain as the main address for my site”. Afterwards, check Settings → General in WordPress: both URLs should show your real domain, starting with https. One warning: don’t share or pin links to the temporary address in the meantime, because those will break. Still stuck on the name itself? My travel blog name ideas and checker workflow will sort you out in an afternoon.
Common question
I did the manual install and now my site just says “Error establishing a database connection”. Have I broken it?
Aghosh Babu Author
No. That message means WordPress is installed fine but can’t log in to its database, and it’s nearly always a typo. Open File Manager in cPanel, go to public_html and edit wp-config.php. Check three lines against what you wrote down: the database name, the database username and the password. The usual culprit is the prefix. cPanel sticks your account name on the front of both, so it’s acct_travelblog, not travelblog. Also confirm in MySQL Databases that the user is actually added to the database with All Privileges; people create both and forget to connect them. Save and refresh. If you’re on Bluehost’s automatic install and see this error, it’s their side, so go straight to live chat. And if it’s still not playing, send me the exact message you’re seeing and I’ll help for free.